TR4 Restoration
From the day that I purchased the TR4A, the intent was to do a full
frame-off restoration. I had no idea what I was getting myself into since I had never
worked on a Triumph. In fact, I did not even inspect the TR4A, other than to drive it and
acknowledge that the car would require a complete rebuild. I basically felt that I would
strip the car down to the frame and replace whatever parts needed to be replaced to
restore the car 100%. I also had the ridiculous notion that I could do a full frame-off
restoration on the car for around $5,000. Using the TRF, MOSS and Victoria British
catalogs, I added up all the parts that were required and this was the figure that I came
up with. Needless to say, this figure is not even 1/2 of what was eventually
required. After I purchased the car, it was driven the 65 miles from Washington, DC to my
Pennsylvania home and parted in the garage. I drove the car a few times around the block
and in the alley and then started stripping the car down. I started with the interior.
This was the worse part of the car from a cosmetic standpoint. The beautiful wooden dash
had been recovered with wood grain contact paper by some DPO and this had faded and peeled
into an ugly mess.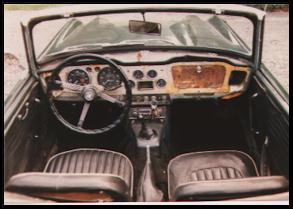 As I
removed each component, I carefully placed the hardware in a numbered zip lock bag and I
used a notebook to record the removal process and any special notes, wiring diagrams, etc.
Without this written log, the rebuilding process would have been much more difficult eight
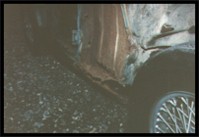
long years later. As the parts were removed, there were few surprises, other than the
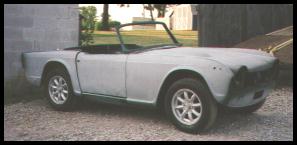
amount of rust in the car. As you can see from the pictures, the car did not look too bad
(from a distance). The outer body panels had some small rust bubbles, but there were no
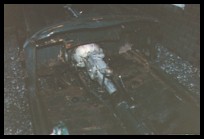
large holes. As I removed the interior, the true state of the car was to become evident. The car had severe rust and as I
inventoried the parts required it was evident that I was in over my head. The car would
need new floor pans on both sides, new rockers (both inner and outer). It also needed a
bulkhead panel on the passenger side as this had accident damage to the rocker and this
panel. The DPO had replaced the front fender, but had not properly repaired the underlying
panels. This was to come back and haunt me 8 years later as you will see. The DPO had also
"repaired" the drivers side floor pan with a 35-MPH Speed Limit sign. Once the
interior was removed and labeled, I could start on the body panels. All of these removed
quickly and easily, although I found out that three of the fenders were too rusty to
reuse. The costs were beginning to go up. As I
removed each component, I carefully placed the hardware in a numbered zip lock bag and I
used a notebook to record the removal process and any special notes, wiring diagrams, etc.
Without this written log, the rebuilding process would have been much more difficult eight
long years later. As the parts were removed, there were few surprises, other than the
amount of rust in the car. As you can see from the pictures, the car did not look too bad
(from a distance). The outer body panels had some small rust bubbles, but there were no
large holes. As I removed the interior, the true state of the car was to become evident. The car had severe rust and as I
inventoried the parts required it was evident that I was in over my head. The car would
need new floor pans on both sides, new rockers (both inner and outer). It also needed a
bulkhead panel on the passenger side as this had accident damage to the rocker and this
panel. The DPO had replaced the front fender, but had not properly repaired the underlying
panels. This was to come back and haunt me 8 years later as you will see. The DPO had also
"repaired" the drivers side floor pan with a 35-MPH Speed Limit sign. Once the
interior was removed and labeled, I could start on the body panels. All of these removed
quickly and easily, although I found out that three of the fenders were too rusty to
reuse. The costs were beginning to go up.
Since I did not have access to an engine crane, I decided
to remove the body first and then deal with the mechanics. The body bolts all removed
easily without effort. It seems that the factory must use a caulk on the threads. Even
bolts that had the heads rusted off, removed from the frame using vice grips. We measured
the frame and the body and built a wooden jig to support the body in the same manner as
the frame. Once this was completed, I got four friends to help me lift the body on off the
frame and onto the jig. I then concentrated on the frame and chassis, since this is what I
felt most comfortable with. I stripped everything off of the frame and sandblasted the
frame to bare metal. The frame was painted with primer and then gloss black paint. All
suspension parts were
 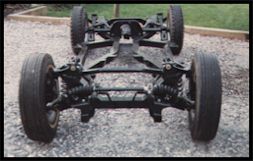 sandblasted and repainted with epoxy
paint. New springs (coil and leaf), bushings, shocks, tie rod ends, etc. were replaced as
necessary. This was all assembled on the frame and the car started to take shape. Remember
this was during the winter of the first year that I purchased the car. At this pace, I
figured the car would be done by summer or late fall at the worse. The rear end was
sandblasted and new oil seals were installed. A reputable shop using the TRF kit rebuilt
the transmission. The drive shaft was sandblasted and painted and new u-joints were
installed. All new brakes were installed, including new hoses and brake lines. All of this
was installed on the frame and I had a rolling chassis again. With the chassis done, I was
ready to start on the body. The engine was put off to last, mainly due to the cost. On the
body shell, I did not know how to weld, but I figured I could learn. I bought a small
welder from Eastwood and practiced on scrap metal. The body shell would be tricky to
restore and I was very inexperienced. Eastwood sells a spot weld remover that works well.
I used it to drill out the spot welds on a floor pan and inner/outer rocker. You want to
do one side at a time, as the panel alignment for the door gaps is critical. I flipped the
body shell over several times, to test alignment and to access all the spot welds. We then
used steel pop rivets to hold the floor pan, rocker and inner rocker panels together and
to the body shell. Once we were happy with the fit, we fitted the fenders and the door to
test the alignment. At this point, It was ready to weld. I will not try to kid you; I am a
terrible welder. But the panels did get installed and I got better with experience. Once I
had done both sides, we fitted the doors and fenders to check the alignment. I was not
happy with the driver's side and we moved the outer rocker back 1/2 an inch. I had also
just bought another TR4A with three friends and we cannibalized the car at my home. I got
a new wiring harness, the rear valance, an excellent TR4A sandblasted and repainted with epoxy
paint. New springs (coil and leaf), bushings, shocks, tie rod ends, etc. were replaced as
necessary. This was all assembled on the frame and the car started to take shape. Remember
this was during the winter of the first year that I purchased the car. At this pace, I
figured the car would be done by summer or late fall at the worse. The rear end was
sandblasted and new oil seals were installed. A reputable shop using the TRF kit rebuilt
the transmission. The drive shaft was sandblasted and painted and new u-joints were
installed. All new brakes were installed, including new hoses and brake lines. All of this
was installed on the frame and I had a rolling chassis again. With the chassis done, I was
ready to start on the body. The engine was put off to last, mainly due to the cost. On the
body shell, I did not know how to weld, but I figured I could learn. I bought a small
welder from Eastwood and practiced on scrap metal. The body shell would be tricky to
restore and I was very inexperienced. Eastwood sells a spot weld remover that works well.
I used it to drill out the spot welds on a floor pan and inner/outer rocker. You want to
do one side at a time, as the panel alignment for the door gaps is critical. I flipped the
body shell over several times, to test alignment and to access all the spot welds. We then
used steel pop rivets to hold the floor pan, rocker and inner rocker panels together and
to the body shell. Once we were happy with the fit, we fitted the fenders and the door to
test the alignment. At this point, It was ready to weld. I will not try to kid you; I am a
terrible welder. But the panels did get installed and I got better with experience. Once I
had done both sides, we fitted the doors and fenders to check the alignment. I was not
happy with the driver's side and we moved the outer rocker back 1/2 an inch. I had also
just bought another TR4A with three friends and we cannibalized the car at my home. I got
a new wiring harness, the rear valance, an excellent TR4A
 grill and a spare transmission.
The rear valance was installed and a new front valance was installed at the same time. At
this point, the restoration began to slow down. With the major welding done, it was
apparent that I was going to need many new body panels. It was also apparent that it would
be several years until I had saved up enough money to be able to complete the car. It was
around this time that I bought the Spitfire and spent my time working on this
"driver". The Spitfire used up all my available resources and time, but it was
fun and it allowed me to actually drive a Triumph, rather than just look at one. As
I started needing gar grill and a spare transmission.
The rear valance was installed and a new front valance was installed at the same time. At
this point, the restoration began to slow down. With the major welding done, it was
apparent that I was going to need many new body panels. It was also apparent that it would
be several years until I had saved up enough money to be able to complete the car. It was
around this time that I bought the Spitfire and spent my time working on this
"driver". The Spitfire used up all my available resources and time, but it was
fun and it allowed me to actually drive a Triumph, rather than just look at one. As
I started needing gar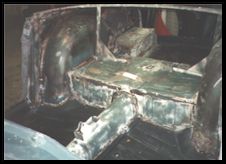 age space, the TR4A body was placed back on the frame and the car sat for
several years. After I had traded the Spitfire for the Stag, the TR4A was used to store
Stag parts as the Stag was restored. Every now and than, I would buy a part for the TR4A
as I had spare money. Sometimes it would be a small item; other times it might be
something like a steering wheel, or other needed piece. This kept my interest up and
forced me to keep on thinking that the car must be completed. When we moved, back in 1993,
I made up my mind that the TR4A was to be either finished or sold. Since I had so much
time and money invested, I knew that this me age space, the TR4A body was placed back on the frame and the car sat for
several years. After I had traded the Spitfire for the Stag, the TR4A was used to store
Stag parts as the Stag was restored. Every now and than, I would buy a part for the TR4A
as I had spare money. Sometimes it would be a small item; other times it might be
something like a steering wheel, or other needed piece. This kept my interest up and
forced me to keep on thinking that the car must be completed. When we moved, back in 1993,
I made up my mind that the TR4A was to be either finished or sold. Since I had so much
time and money invested, I knew that this me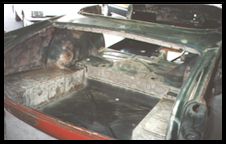 ant that I had to finish the car. To
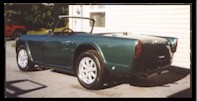
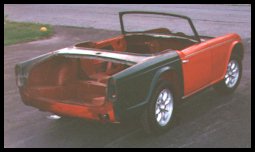
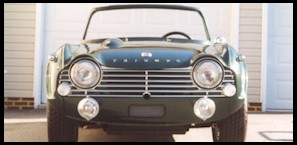
further motivate me, I also decided that instead of restoring the car to original
condition, I was more interested in what I had seen in a recent issue of Classic Cars
Magazine. They had featured three identical TR4s that had been restored for use in
European road rally's. They were painted BRG and featured roll bars, performance engines,
racing seats, harnesses, and performance suspension. They had K&N (Minilite) wheels
and 195/65/15 performance tires. They also did not have bumpers and looked very racy. All
the modifications were easily reversible, so I decided that this is how I wanted to finish
my car. So I sold the wire wheels and purchased the K&N wheels and Yokohama AVS
performance tires. The wheels and tires made the unfinished body and chassis take on a new
life and helped motivate me further. I also ordered used rear fenders from an advertiser
in Hemmings. The first real work on the body began in the fall of the 6th year
of ownership. I sandblasted the entire body shell, as surface rust had begun to form in
the areas where I had previously sandblasted and welded. With this removed, I painted the
entire shell with Corlyss rust inhibiting paint from Eastwood. I also went over all the
welds in the body panels and ant that I had to finish the car. To
further motivate me, I also decided that instead of restoring the car to original
condition, I was more interested in what I had seen in a recent issue of Classic Cars
Magazine. They had featured three identical TR4s that had been restored for use in
European road rally's. They were painted BRG and featured roll bars, performance engines,
racing seats, harnesses, and performance suspension. They had K&N (Minilite) wheels
and 195/65/15 performance tires. They also did not have bumpers and looked very racy. All
the modifications were easily reversible, so I decided that this is how I wanted to finish
my car. So I sold the wire wheels and purchased the K&N wheels and Yokohama AVS
performance tires. The wheels and tires made the unfinished body and chassis take on a new
life and helped motivate me further. I also ordered used rear fenders from an advertiser
in Hemmings. The first real work on the body began in the fall of the 6th year
of ownership. I sandblasted the entire body shell, as surface rust had begun to form in
the areas where I had previously sandblasted and welded. With this removed, I painted the
entire shell with Corlyss rust inhibiting paint from Eastwood. I also went over all the
welds in the body panels and
 re-welded where necessary. With this done, I flipped the body
shell upside down and painted the underside of the car. After the paint was dry, I
undercoated the entire bottom of the car and mounted the body to the frame with a TRF body
mount kit. With the body mounted, we installed all the outer sheet metal and checked the
alignment. The driver's side was almost perfect, but the passenger's side was not right
and we figured that the body would need to be shimmed on the frame to get the right fit.
With this all done, I had chickened out on painting the car myself. We painted the
Spitfire with decent results, but I was not up to painting the TR4A. Too many complicated
curves and wavy panels. Since the guy that had painted the Stag had not expressed an
interest in painting the TR4A, I figured that the cost would be prohibitive. His shop is
mainly a collision shop and he had done the Stag as a favor and because the car did not
require much bodywork. I had another guy look at the car and he gave me an estimate of
$2,500. This seemed high, but since this included removing the body from the frame,
straightening all the panels, painting the shell, remounting on the frame and aligning the
bolt on panels prior to the final paint, I guess it was reasonable. This also included
undercoating and repairing of several fenders that had some damage. The paint stage took 6
months but the result was a great job and a very straight TR4A.While the car was in the
body shop, I built up the engine. re-welded where necessary. With this done, I flipped the body
shell upside down and painted the underside of the car. After the paint was dry, I
undercoated the entire bottom of the car and mounted the body to the frame with a TRF body
mount kit. With the body mounted, we installed all the outer sheet metal and checked the
alignment. The driver's side was almost perfect, but the passenger's side was not right
and we figured that the body would need to be shimmed on the frame to get the right fit.
With this all done, I had chickened out on painting the car myself. We painted the
Spitfire with decent results, but I was not up to painting the TR4A. Too many complicated
curves and wavy panels. Since the guy that had painted the Stag had not expressed an
interest in painting the TR4A, I figured that the cost would be prohibitive. His shop is
mainly a collision shop and he had done the Stag as a favor and because the car did not
require much bodywork. I had another guy look at the car and he gave me an estimate of
$2,500. This seemed high, but since this included removing the body from the frame,
straightening all the panels, painting the shell, remounting on the frame and aligning the
bolt on panels prior to the final paint, I guess it was reasonable. This also included
undercoating and repairing of several fenders that had some damage. The paint stage took 6
months but the result was a great job and a very straight TR4A.While the car was in the
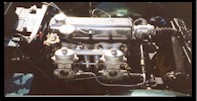
body shop, I built up the engine.
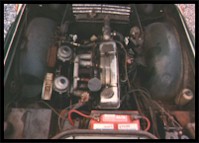
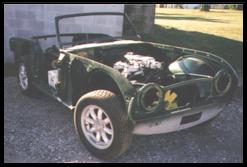 The chassis was stored in my garage, during much of the bodywork,
so this allowed me to build and install the engine on the chassis. The engine rebuild was
done as a mild performance engine so the following was done. 87 MM pistons and liners, new
valves, rockers and shaft, new performance cam and lifters. The head was ported and shaved
.090 as the performance manual dictates. The crank was turned .010 undersize and new
bearings fitted. A new oil pump and water pump was fitted as well. Everything was
sandblasted and painted to look 100% new. The Stromberg carbs. were replaced with walnut
shell bead blasted, rebuilt units. Velocity stacks complete the performance look. A Monza
header was ported and then sent out to Jet Hot coatings for their ceramic coating in
silver. A new clutch and pressure plate completed the engine. This was easily installed on
the chassis and the entire assembly awaited the painted body shell. When the body was
almost ready for the final paint, I got a scare. The passenger door could not be made to
align right with the rocker and fender lines. He shimmed the body as I suggested, but it
was not good enough. As I mentioned previously, the small "accident" that the
car had suffered at some time in it's long life had come back to haunt me. We had to take
the car to a frame shop and have the rocker panel The chassis was stored in my garage, during much of the bodywork,
so this allowed me to build and install the engine on the chassis. The engine rebuild was
done as a mild performance engine so the following was done. 87 MM pistons and liners, new
valves, rockers and shaft, new performance cam and lifters. The head was ported and shaved
.090 as the performance manual dictates. The crank was turned .010 undersize and new
bearings fitted. A new oil pump and water pump was fitted as well. Everything was
sandblasted and painted to look 100% new. The Stromberg carbs. were replaced with walnut
shell bead blasted, rebuilt units. Velocity stacks complete the performance look. A Monza
header was ported and then sent out to Jet Hot coatings for their ceramic coating in
silver. A new clutch and pressure plate completed the engine. This was easily installed on
the chassis and the entire assembly awaited the painted body shell. When the body was
almost ready for the final paint, I got a scare. The passenger door could not be made to
align right with the rocker and fender lines. He shimmed the body as I suggested, but it
was not good enough. As I mentioned previously, the small "accident" that the
car had suffered at some time in it's long life had come back to haunt me. We had to take
the car to a frame shop and have the rocker panel
 moved forward 1/2
inch. They do this with the body on the frame and it is nothing short of amazing. The car
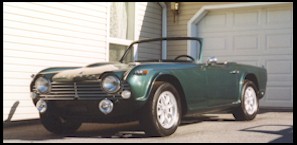
came back with the door fitting perfectly and after the scratches (from the hydraulic
rams) were repaired, the car received it’s final coats of dark green metallic paint
and clear coat. It is now July 2, 1997. The TR4A returned from the body shop on June 11th.
I have installed the crash pads, wiring harness, grill, lights and the gas tank. The
steering was installed last weekend. It will be a few more months until the car is
completed, but it will be competed before the end of 1997. I have 90% of the parts
remaining to complete the car. This includes the walnut dash, racing seats, complete
interior panels and trim, etc…This page will be updated as the car starts for the
first time in eight years and takes to the road again. I am excited and nervous as I have
yet to drive a TR4A with these performance modifications. The car looks racy and like
nothing else on the road. moved forward 1/2
inch. They do this with the body on the frame and it is nothing short of amazing. The car
came back with the door fitting perfectly and after the scratches (from the hydraulic
rams) were repaired, the car received it’s final coats of dark green metallic paint
and clear coat. It is now July 2, 1997. The TR4A returned from the body shop on June 11th.
I have installed the crash pads, wiring harness, grill, lights and the gas tank. The
steering was installed last weekend. It will be a few more months until the car is
completed, but it will be competed before the end of 1997. I have 90% of the parts
remaining to complete the car. This includes the walnut dash, racing seats, complete
interior panels and trim, etc…This page will be updated as the car starts for the
first time in eight years and takes to the road again. I am excited and nervous as I have
yet to drive a TR4A with these performance modifications. The car looks racy and like
nothing else on the road.
 December 1998 update The TR4A is very close to completion. Basically the final carpet, and
windshield remain to be installed. The engine is almost running (three cylinders) and I'll
have to recheck the timing to get it fully running. One thing that does not appear in
these photos is a surrey top. At the Summer Party this past year, we found a vendor
selling a surrey top complete with frame, back glass, and the aluminum hard top panel. I
had the back frame painted to match the car, and ordered all the components for the top.
One by one, they arrived from TRF and the assembly began. The car now sports this new top
and it adds to the racy look. The actual surrey top arrived here in early December (a
Christmas present to myself!) and now the car is almost complete. After breaking the
second windshield, December 1998 update The TR4A is very close to completion. Basically the final carpet, and
windshield remain to be installed. The engine is almost running (three cylinders) and I'll
have to recheck the timing to get it fully running. One thing that does not appear in
these photos is a surrey top. At the Summer Party this past year, we found a vendor
selling a surrey top complete with frame, back glass, and the aluminum hard top panel. I
had the back frame painted to match the car, and ordered all the components for the top.
One by one, they arrived from TRF and the assembly began. The car now sports this new top
and it adds to the racy look. The actual surrey top arrived here in early December (a
Christmas present to myself!) and now the car is almost complete. After breaking the
second windshield,
 I have now decided to take the windshield frame to a glass shop to
install the windshield. The funny thing (if any of this can be funny) is that I installed
the windshield in the Stag without any problems and the back glass in the hard top. You
would think that the hard top back glass would be the real problem with the complex curves.
The TR4A only needs a few weekends of final prep. and it will be hitting the road some
time in January or February (depending upon the weather). After ten long years, this
project is finally about to be enjoyed! I have now decided to take the windshield frame to a glass shop to
install the windshield. The funny thing (if any of this can be funny) is that I installed
the windshield in the Stag without any problems and the back glass in the hard top. You
would think that the hard top back glass would be the real problem with the complex curves.
The TR4A only needs a few weekends of final prep. and it will be hitting the road some
time in January or February (depending upon the weather). After ten long years, this
project is finally about to be enjoyed!
Would I do it again?
Yes and no. I made some very stupid mistakes in the original purchase
and was very lucky to have had basically a solid car under the rusty body. With the
condition of the body shell, it is absolutely amazing that the frame was in excellent
condition. I attribute this to the fact that the car is a solid axle TR4A. These models do
not suffer the frame rot that infects the TR4-6 models with the IRS suspension. If I were
to do another frame off restoration, I would start with a much more solid car (as I did
with the Stag). You get what you pay for (at least you hope you do). A $1,000 car is
probably only worth that and it will cost thousands to make the car like new again.
At least I know what I have and that everything has been taken care of. I guess with a car
that is not as rusty, you would always worry about what is lurking behind the old rocker
panels. I know that rust free California and Arizona cars are available, and I would
seriously investigate these if I did a car in the future.
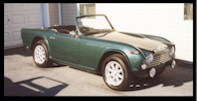
TR4 Restoration Completed! 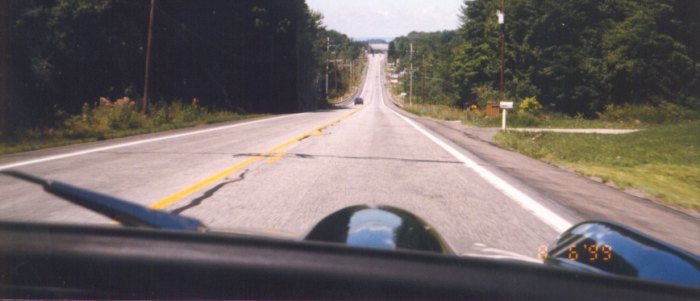
The TR4A as it was meant to be used. The
view out the windshield was taken by my wife as we drove to the TRF Summer Party in August
of 1999. The car performed 100% as I drove it to work in May and June to break it in and
to enjoy it. I ended up putting over 5,000 miles on the car during the summer of 1999. The
only problem in 5,000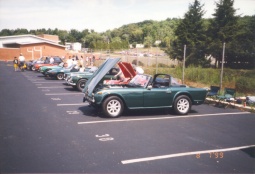 miles of driving was a bad
universal joint that
started getting loud. The drive shaft had been rebuilt, so it was either miles of driving was a bad
universal joint that
started getting loud. The drive shaft had been rebuilt, so it was either 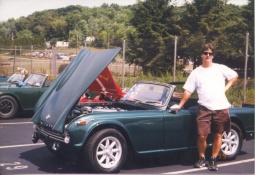 installation
error or a bad joint. At the Summer Party, the TR4A was used by myself and my friend Jim
Keenan at the Autocross. Our best time was a 36.070 which was not too bad considering this
was the first time out. I will be installing an anti-sway bar in the front as a
future modification. With the sticky tires, the car really handles well for such an old
car. The autocross was a very tight course which favored the tight steering and the torque
of the modified TR4 engine. One thing that I really messed up on was in not installing an
overdrive transmission. The gearing is such that an overdrive gear is really necessary on
the highway as the car quickly runs out of revs. It will pull strongly in all four gears
up to about 90 MPH where it is running around 5,500 RPM. With the high compression head,
it needs high octane gas and it likes the installation
error or a bad joint. At the Summer Party, the TR4A was used by myself and my friend Jim
Keenan at the Autocross. Our best time was a 36.070 which was not too bad considering this
was the first time out. I will be installing an anti-sway bar in the front as a
future modification. With the sticky tires, the car really handles well for such an old
car. The autocross was a very tight course which favored the tight steering and the torque
of the modified TR4 engine. One thing that I really messed up on was in not installing an
overdrive transmission. The gearing is such that an overdrive gear is really necessary on
the highway as the car quickly runs out of revs. It will pull strongly in all four gears
up to about 90 MPH where it is running around 5,500 RPM. With the high compression head,
it needs high octane gas and it likes the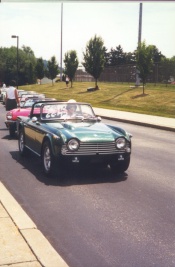 Sunoco 94 octane
best. It will run fine on regular 93 with some octane booster added. I installed a stock
compression head during the initial setup and break-in to see how it performed, but missed
the crispness and the car felt like it had lost 10 HP. It really Sunoco 94 octane
best. It will run fine on regular 93 with some octane booster added. I installed a stock
compression head during the initial setup and break-in to see how it performed, but missed
the crispness and the car felt like it had lost 10 HP. It really 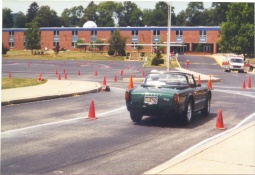 runs great with all
the engine modifications. The only thing that I would consider doing in addition to the
current modifications would be to either install a set of 2" SU carbs or Weber DCOEs
or fit the low compression head and try to find an old Judson Supercharger. We all had a
great time at the 1999 Summer Party and I'm trying to come up with a cool place to take my
wife to compensate for all the years she's been by my side at these car events. Any
suggestions? I will stick with the TR4A as I like it more as a driver's car. The
Stag is in it's prime on the open highway and as a long distance cruiser it is hard to
beat. The runs great with all
the engine modifications. The only thing that I would consider doing in addition to the
current modifications would be to either install a set of 2" SU carbs or Weber DCOEs
or fit the low compression head and try to find an old Judson Supercharger. We all had a
great time at the 1999 Summer Party and I'm trying to come up with a cool place to take my
wife to compensate for all the years she's been by my side at these car events. Any
suggestions? I will stick with the TR4A as I like it more as a driver's car. The
Stag is in it's prime on the open highway and as a long distance cruiser it is hard to
beat. The 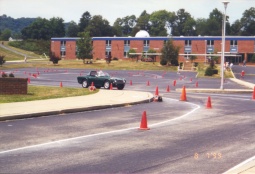 new Surrey top was definitely a good idea. Erecting the soft top
only takes a few minutes and it is dry and warm. With the top off, the car is pretty calm
and the back glass is so big and open that you never feel like new Surrey top was definitely a good idea. Erecting the soft top
only takes a few minutes and it is dry and warm. With the top off, the car is pretty calm
and the back glass is so big and open that you never feel like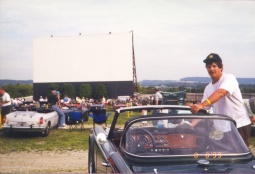 you are not in a
convertible. Definitely a good idea if you can find one. you are not in a
convertible. Definitely a good idea if you can find one.
The TR4A was well worth all the
effort and hard work. It is a rare car and finding one in this condition is very
difficult. It is  one of the most fun cars I have owned and on a back road or even just going to
the local store is an adventure. I suspect that this car is one that I will be keeping for
the rest of my life. Too much blood, sweat and tears and too much history to part with it.
If this helps other TR owners to complete their projects, then this web site was worth the
effort! one of the most fun cars I have owned and on a back road or even just going to
the local store is an adventure. I suspect that this car is one that I will be keeping for
the rest of my life. Too much blood, sweat and tears and too much history to part with it.
If this helps other TR owners to complete their projects, then this web site was worth the
effort!
|